Preparing Your Veggie Garden Soil – It’s not too late
May, the planting month for so many, has suddenly arrived and it’s been five years since your last soil test by a laboratory. You didn’t get your soil sample to the lab in time for testing this year. No worries. Plan now for next year. Meanwhile, here’s a quick recap of how to test your soil at home so you can amend it before transplanting those May seedlings to the veggie garden. Adding nutrients to the soil and providing a mulch layer at the same time will help retain moisture and feed your plants.
Conducting an easy soil test will give you information you need before heading to the nursery for compost or using your composter contents.
- In your veggie garden, scrape away the first 5 cm of soil and dig a hole 15 to 20 cm deep where plant roots actually grow. At this depth collect a soil sample using a 1-litre, straight-sided jar (an empty pickle or canning jar works well) and fill it ¾ full.
- Indoors, spread the soil out on old newspaper and pick out stones, twigs and other debris. Let the soil dry out for a few days.
- Run the dry soil through an old sieve or colander to remove smaller stones and other debris. Pour the dry, cleaned soil back into the jar and fill it with water to ¾ full.
- Lid the jar and shake it well to make sure all soil is wet. Leave the jar to sit undisturbed for a few days until the soil separates into layers and the water is fairly clear. (Organic material may float to the top in soil samples taken less than 15 cm below the surface.)
Observe what happens…
The bottom layer will be the sand, the heaviest component. The next finer silt layer will appear darker than the sand, and the top layer will be formed by light coloured clay – the finest and lightest particles in the sediment. If you find your layers difficult to see, it helps to hold your jar to a good daylight window on a bright day.
Measure the Result
-
a) Using a ruler, measure each layer in millimeters and record the mm thickness of each layer (e.g. 28mm sand; 8mm silt; 12 mm clay).
b) Next, measure the total thickness of all layers together (e.g.: 48 mm)
c) Last, calculate the percentage of each layer by dividing the millimetre thickness of each layer by the total soil mm thickness (Do this for each of sand, silt & clay)
Then check your calculations by adding your percentages below for a total (100%)
Layers in Percentages:
____ % Sand
____ % Silt
____ % Clay
__________
100 % Total
GOAL: The ideal is to have 40% sand, 40% silt and 20% clay. This perfection is called “loam”.
Work to improve your soil over the years so that you move closer to loam. This soil will be friable (easily crumbled). Soil clods and lumps yield easily in your hand, breaking into smaller bits when crushed. Sandy soils are loose and non-cohesive while clayey soils are difficult to crush.
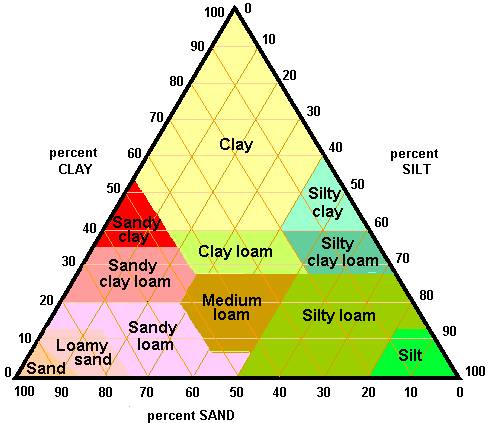
- Translate your soil test results by using the pyramidal chart on page 39 of your Sustainable Gardening manual (Ch. 2 – Soils and Fertilizers) to plot your three percentages on the chart and see where they meet. This will tell you what kind of soil you have, whether it’s sandy loam, clay loam, silt loam, sandy clay loam, and so on. OR Find a link to the triangle here
Armed with some basic information of where your soil structure is weak, you can now take steps to amend it with the appropriate organic or mineral material using leaf mulch, compost or simply sand.
Let’s say, for example, that your soil test results prove you have “sandy loam” which means you have a higher percentage of sand in your soil than the ideal 40%. You’ve decided to head to the nursery to buy compost to balance out the sand with more organic material. (Note: 1 cubic yard will cover 300 square feet at 1” thickness.) Ask the nursery attendant for the breakdown in percentages of sand, clay and silt so you can assess which product is best for your needs – the one with the lowest sand content. A recently purchased premium compost bought from this writer’s local nursery contained 6-7% sand.
PRO TIP:
Remember, adding organic matter reduces erosion, improves soil porosity, infiltration and drainage. It also holds water and nutrients for plants and soil organisms. Finally, it stores and releases nitrogen, phosphorus and sulfur slowly, making these nutrients available to plants as soil microorganisms break down the organic matter over time. Organic material with an intermediate carbon to nitrogen ratio (C:N ratio) such as many composts, leaf mulches and cover crop residues (the latter used more often by farmers), have lower nutrient availability which means you can add them to your soil in large amounts.
For more information on composts and making your own, or adding fertilizer to specific plants refer to pages 54-55 (Chapter 2 – Soils and Fertilizers) as well as Chapters 7-13 in Sustainable Gardening; also see Metro Vancouver’s pamphlet, “Here’s the Dirt: Backyard Composting” and read p.2, “10 Easy Steps” here
For more information on buying topsoil, visit the BC Ministry of Agriculture for their Soil Fact Sheet: Buying Topsoil: here
Growing veggies in containers?
Online Grow Green Guide has some excellent plans and ideas here. Tip: Narrow your search to Balcony or Patio/Food
(MGs: See the BC Supplement 2020, p. 131, and Linda Gilkeson’s Backyard Bounty: The Complete Guide to Year-round Organic Gardening in the Pacific Northwest, Ch. 7, p171-184, Soil and Fertilizing – p. 179. )
Need More Book ideas? M. Bartholomew, Square Foot Gardening, Rodale Inc., copyright Mel Bartholomew 2005, p. 243 addresses containers and soil for patio gardens
Complete references below.
Finally, if you plan to visit your local nursery this spring, be sure to visit their website or social media page first to learn of any reduced hours of operation and COVID-19 related protocols.
Prepared by VMG 2020 Student, Susan L.
Sources consulted for this article:
- Master Gardeners Association of BC, Vancouver Basic Training Program: BC Supplement 2020, January 2020, p. 45-46. ( available to MGs only)
- Washington State University Extension, Oregon State University Extension Service, Sustainable Gardening: The Oregon-Washington Master Gardener Handbook, April 2013, p. 39, 54-55.
- Metro Vancouver, Solid Waste Management, “Here’s the Dirt: Backyard Composting”
- BC Ministry of Agriculture, Soil Fact Sheet: Buying Topsoil, Fact Sheet 610.000-5, p.1-2
- L. Gilkeson, Backyard Bounty: The Complete Guide to Year-round Organic Gardening in the Pacific Northwest, New Society Publishers, 2018, Ch. 7, p.171-184, Soil and Fertilizing: p. 179.


