Anatomy of a Modern Mediterranean Garden
The Challenges [photo 1: before the renovation – front yard garden]
- Lose the summer-browned front lawn and replace it with a colourful, fragrant, easy-care oasis – a ‘Modern Mediterranean’ garden using a mix of drought-tolerant, Mediterranean and beloved plants that all fit a selected colour scheme. Include native plants.
- Design the new front yard garden to complement the architecture, proportions and colour of the house and redirect the focus from the plain exterior house façade to the garden
- Eliminate the water gathering at the bottom of the sloped front lawn and build healthy soil
- Include a raised vegetable garden incorporating front yard aesthetics
- Create an invitation to pollinators to visit, dine and drink
Existing Work Arounds…
A dominant feature of the front yard is the large rust-coloured wooden pergola that separates the front yard from a courtyard leading to the front door in the centre of the ‘U’ -shaped house. Two Japanese Maples (Acer palmatum) at the front of the house were kept, along with two large English Yews (Taxus baccata ‘fastigiata’) because they added height and beauty and could be shaped to maintain proportions in the fall. An old and overgrown Mugo pine (Pinus mugo) covering half of one front window was removed but replaced later with a Slowmound Dwarf Mugo pine (Pinus mugo ‘Slowmound’) in a different location of the garden.
The Vision [photo 2: After hardscaping installed ]Personal travels and living experiences in the Mediterranean bring to mind terraces, olive trees and French parterres with crushed limestone walkways. In this vision of a new front yard garden there is a mix of informal and formal elements but no topiaries, sculpted plants or mazes.I envisioned an upper terrace with a very low ledgestone wall to maintain a modern horizontal look in keeping with the flat-topped, low roofline of the house. I also foresaw two stone veggie boxes on the upper terrace and a small bubbler fountain which would create interest and water for pollinators and provide a smaller focal point. I saw a step or two down to the lower level and a path across the front yard to the driveway.
~~~
Steel would create clean edging along beds on the upper level in keeping with a modern feel and would turn a nice rust colour with a bit of time. A crushed stone path through the lower level would further separate garden beds from the walkway. The front yard benefits from a southern exposure but the sides and back are more woodland than Mediterranean so this was the only likely location for this kind of garden on our property. I could imagine it would also work on a western exposure.
Hardscaping and Foundational Plants
[Photo 3: Climber Rose planted June 2019]
To better integrate the dominant pergola with the garden I added a yellow climbing rose and started to train it over the top to soften the structure and create a more inviting entrance to the courtyard. The rust-colour of the pergola formed a strong colour element and so I tied several elements to it with rusted modern metal cylinders added at the base of the structure as plant holders.
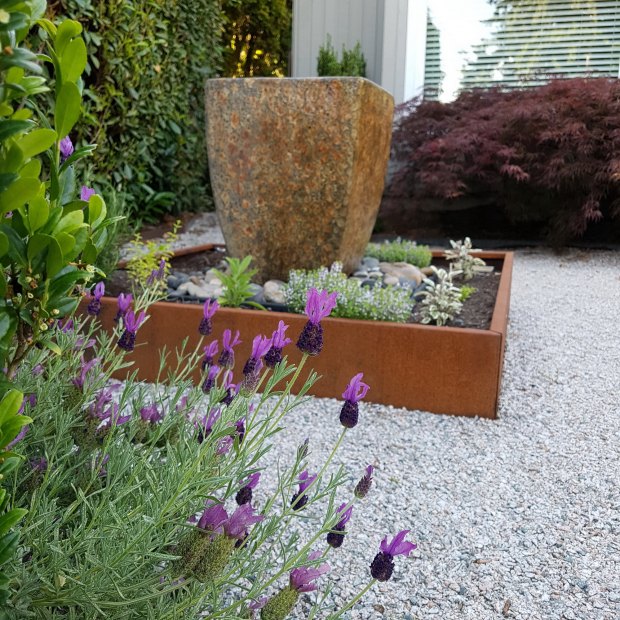
I found a clean-lined cream and butterscotch-coloured planter to form the basis for the bubbler fountain and surrounded it with a 4’ x 4’ Corten steel raised garden bed frame which turned a beautiful rust colour within one season.
[Photo 4: Planter Bubbler Fountain w Corten Steel Surround ]Custom-cut ¼” thick steel 6” high was used to edge and define the beds on the upper terrace. All of these items were designed to tie in to the pergola’s rust colour and to complement the soft yellow-green-rust coloured ledgestone selected for the walls.
As for the planting plan, finding the discipline to stick to the design principle of planting three to five of the same plant for a stronger effect can elude me when I get to the nursery and fall in love with a ‘onesie’ that I can’t seem to live without.
[Photo 5: Front Yard Terrace ]I also am guilty of breaking up three similar shrubs and planting them in different areas of the garden to form a sense of repetition. Then again, the garden is small enough that the design integrity is not completely lost by separating a triumvirate of shrubs when you only have to walk a couple of steps to see the next one.
[Photo 6: Mediterranean Front Yard Garden June 2020 ]
I’m also one to plant things closer together than is recommended for the mature-sized plant. I see this as a personal choice but this habit can invite trouble when it comes to controlling certain unwanted guests, not to mention mildew.
This spring spittle bugs paid a visit and they particularly liked the lavenders planted last spring on the upper terrace. In my daily hunt for the seed-sized lime green critters amid the foamy “spittle” I managed to get over the ‘ugh’ factor and squish them between my fingers; this proved effective because after three or four days of detective work, I couldn’t find any more and the plants displayed no damage. Problem solved.
[Photo 7: in the Modern Mediterranean Garden ]
Colour Scheme
Design sources recommend no more than five colours. I had five in mind. The existing burgundy Asian maple and burgundy-flowering clematis determined in part my starting point on the colour wheel. To these I added a standard grown burgundy-coloured Smoketree (Cotinus coggygria) which was placed at the back of the garden because of its foreseen mature height and width.
Other colours selected for plantings included white, lavenders / blues, yellow, various shades of green but with chartreuse being prominent.
[Photo 8: Modern Mediterranean Garden in Jul2020]
Sometimes, colour can complement but also contradict the selected colour palette when a plant’s colours change through the seasons.
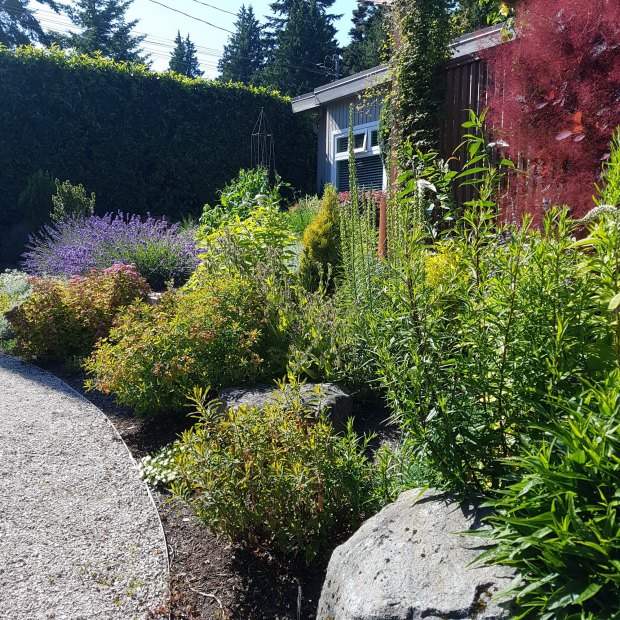
For instance, I bought three spirea ‘Magic Carpet’ shrubs for their beautiful chartreuse coloured leaf complementing other chartreuse plants in spring like the Mounded Spurge (Euphorbia polychroma), Bluebeard ‘Lil’ Miss Sunshine’ (Caryopteris 'Lil' Miss Sunshine'), Lithodora ‘Gold ‘n Sapphires’, and Angelina sedum (Sedum rupestre); however, this beautiful chartreuse spirea leaf turns golden with an orange-red throat and sports pink blooms in June – the cultivar name of ‘Magic Carpet’ should have been my tip-off.
Fortunately, the bright chartreuse leaf of Mounded Spurge also happens to turn orange-red by June, so the resulting effect throughout the lower level of the garden looked intended, even if the colour palette suddenly surprised me temporarily. Fortunately, the pink blooms don’t last too long and by early July the shrub is due to be sheared by one third to promote new growth.
[Photo 9-July in the Front Yard Garden ]
The white colour appears in the garden in the form of silvery-white-sage leaf colours throughout the seasons on various herbs; white also can be seen on spring blooms like Spring Bouquet Laurustinus (Viburnum tinus ‘Compactum’), Burkwood’s Osmanthus (Osmanthus x burkwoodii), Evergreen Candytuft (Iberis s. ‘Snowcone’ and ‘Snowflake’), the graceful Leucojum aestivum 'Gravetye Giant', ‘Pearly King’ Saxifrage (Saxifraga ‘Pearly King’) and on the summer blooms of Casa Blanca lilies (Lillium ‘Casa Blanca’), Ice plant (Delosperma ‘Jewel of Desert Moon Stone’), Dense Blazing Star (Liatris spicata ‘Floristan White’) which is also a native plant), Gooseneck Loosestrife (Lysimachia clethroides), and my favourite because it was an experiment that turned out so well, Boxleaf Hebe (Hebe odora) which only grows in Zone 8.
In addition to the lavenders which added a light purple-blue to the garden, other lavender and blue flowers included spring blooming Italian bugloss (Anchusa azurea), Lithodora “Gold n Sapphire’ and ‘Grace Ward’, Salvia ‘Caradonna’ and later, in June, the newer compact Lacey Blue Russian Sage (Perovskia atriplicifolia ‘Lisslit’). Still later in July, Gentian (Gentiana septemfida var. lagodechiana) and Sea Holly (Eringeum planum ‘Blue Hobbit’) will make their blues and lavender colours known. A good grouping of Michaelmas daisies (Aster amellus), true bee attractors, will take us through the end of summer and into fall. Evergreen shrubs, and many herbs which are evergreen along with flowering evergreens carry us from fall through winter.
[Photo 10: Jun2020 in the Mediterranean Garden]Modern Mediterranean
To my mind, the “modern” part of this design direction is captured in the square and rectangular lines, including the clean edging profile of the hard steel. The slim, horizontal-lined ledgestone walls in soft greens and yellows reflect both a modern and Mediterranean feel while the crushed stone pathways add a contemporary element and Mediterranean parterre mood.
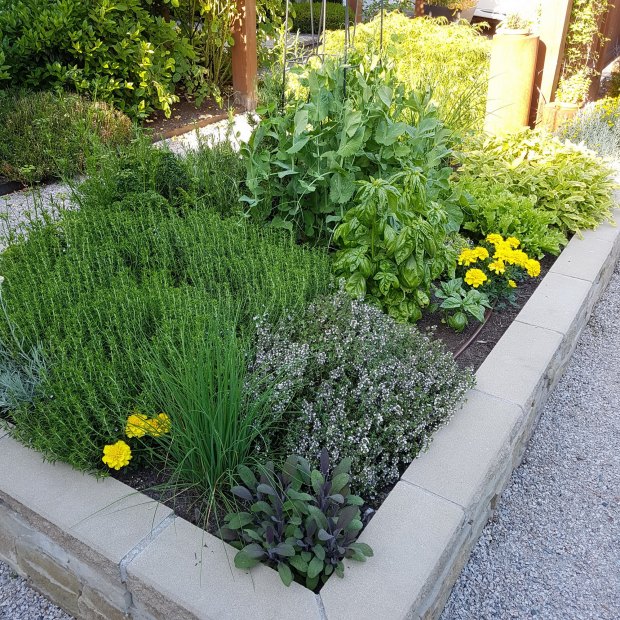
In the planting plan, the large and small raised veggie beds are filled with Mediterranean herbs like rosemary, thyme, lemon thyme, summer and winter savories, Genovese basil, French tarragon, Greek oregano, curly parsley and cilantro. (Interspersed with these are a few real vegetables like peas, cucumbers, chicory, lettuce and strawberry fruits.)
[Photo 11: Front Yard Herb Garden]
The flower beds around the terrace include long-flowering and fragrant plants with sage-green foliage and include spring-bloomers like Spanish Lavender (Lavandula stoechas ‘Giant Summer’), French Lavender (Lavendula stoechas ‘Anouk’), and summer bloomers like English Lavender (Lavendula angustifolia ‘Hidcote Blue’, ‘Hidcote Superior’, and ‘Big Time Blue’), and Lavender Cotton (Santolina chamaecyparissus) with its button yellow flowers.
Even curry plants contribute a grey-green hue. Most of the herbs and all of the sage foliage plants are drought-tolerant once established. One advantage of planting herbs: most damaging insects don’t like them but the pollinators do and in June I see a variety of bumble bees visiting the thyme flowers and pollinating the strawberry flowers.
I’m a perennial experimenter (isn’t every gardener?), so despite the Zone 8 descriptor on the nursery tag of the Boxleaf Hebe, I wanted to give it a try. It would be a good test of the new drainage in the garden and the southern exposure. I was pleased to see that despite a dubious winter drenching and early summer drenching leaving the inside sage leaves starting to turn yellow, it sprang to life in June with new leaves and columnar white blooms.
[Photo 12: 3 Boxleaf Hebes ]
A Problem Solved
We had no sooner gotten the foundational shrubs planted when the City arrived to install a large green box (2.5’ x 2’) containing the main water shut-off valve with room for a future water meter and it required me to relocate one of the shrubs. The City’s installation, while practical, resulted in an aesthetic blight right in the centre of the new garden. After pondering my dilemma, the solution came in the form of a succulent-filled steel bowl planter whose finish I made rusty in one day. Now, when the City needs to access the box, the bowl can be easily removed and the 2 cm of soil below it brushed away. I’ve raised the planter on feet too, so the bowl can drain easily.
(See the easy recipe for rusting steel below.) [Photo 13: Succulent Bowl ]
Some rewarding results…
Before the front garden was created, my husband and I spent 2.25 hours hand watering the front and back gardens every two days in the heat of summer. It was exhausting and when we went away, we had to ask friends, neighbours and house sitters to carry out the tasks. Since installing both a drip system in all planters and veggie raised boxes, and a sprinkler system in the front and back yards which are scheduled for early morning and controlled from our smartphones, we spend only minutes watering a few planters in front and back that are close to the house and we now spend much more time sipping Sauvignon blanc and enjoying the colours, fragrance and tranquility of the garden.
And as more and more of the drought-tolerant and Mediterranean plantings become established, we will be cutting back on the amount of water used. Because the watering program can be monitored and controlled in different areas of the garden, we can turn it off completely or cut back the amount of watering time on different sections of the property depending on the amount of rain predicted. There are always lessons learned and in my planting plan I should have paid more attention to which plants require a little more water than others over the longer term. There may need to be some relocating of plants in the future. But for the most part, the majority of the plants selected only sip water.
Looking at and walking among the new plantings is its own reward but also seeing the hummingbirds, goldfinches, mourning doves and insects drinking from the water bubbler and gathering pollen and nectar from many of the plants, (including Salvia ‘Caradonna’, Michaelmas daisies, roses, lavenders and other herbs), lets me know that we have been successful at inviting wildlife to the garden and maintaining our commitment to furthering the pollinator corridor along the BC coast.
No More Lawn!
Gratitude
Bringing this vision to life required help and we were lucky that cousin Shan Bodie of North Vancouver and her budding landscape design firm, Shan Bodie Garden Design agreed to collaborate with me and turned my design sketches, pages of notes and photos into a cohesive and simplified plan, adding dimensions that a contractor could understand. She also provided a list of suggested plantings and added her own design creativity – I especially liked her curving pathway through the garden that softened the rectangular lines everywhere. Thanks also go to Marc Holley and Second Generation Landscapes who oversaw the hardscaping of the plan, including engineering the improved drainage along the front edge of the garden with sunken pipe, bringing in the expert stonemason, finding the machine shop to custom cut our steel edging and the welder to finish the job onsite; Marc also removed overgrown shrubbery, amended the soil to a deep degree, filled the veggie boxes with organic soil and generally oversaw the execution of the design plan, making his own measurement adjustments for the slopes. We were fortunate to secure such a compatible team of people.
We saved money by executing the planting plan ourselves. Because the hardscaping didn’t happen until July 2018, we postponed planting foundational shrubs and trees until the fall, allowing the new soil to settle and also picking a more stress-free time of year for the plants. I transferred a couple of small shrubs from elsewhere on the property too. The following April, when we planned to start planting perennials, we discovered ground-dwelling miner bees – lots of them – had settled into the new, loose organic soil so we postponed our planting, allowing time for the larvae to hatch undisturbed until late May when they were leaving the ground easily. Even then, we were careful to work around as many bee homes as possible. This second spring and early summer 2020 has been more successful at making real progress on the garden, as both my career retirement and coincidentally, the pandemic have both afforded me more time in the garden.
A Few Planning Considerations for a New Mediterranean Garden
- Water considerations: Seek out drought-tolerant plants, native plants and examine the watering need of each plant so you can group like with like. (Hint: most Mediterranean plants are drought tolerant once established. Remember too, that silvery-white-gray-sage coloured leaves are a good clue that the plant likes sun and is drought-tolerant.) Consider hand watering, soaker hoses, drip systems and if necessary, sprinklers to make the watering task easier as you age and most important, to minimize the water used. Watering from the ground level to avoid wet leaves avoids problems later.
- Complementary plantings: Mediterranean plants look good with grasses and succulents; even alpine versions used to rocky terrain complement Mediterranean plantings.
- Choose 3 to 5 colours for a cohesive design look. Think of both blooms and leaves and how they change from season to season. Repeat colours throughout the garden.
- Design: Plant a specific perennial or small shrub in groups of three or five for greater impact.
- Vary shapes & silhouettes – Choose a variety of shapes and silhouettes to make the garden design interesting: mounded, pyramidal, spreading, creeping, vase-shaped, and so on.
- Height considerations – Step your plants if planting against a wall/fence, placing the tallest at the back, so you see the blooms and colours of each plant. Place tallest in centre in a round garden and step the others down to the perimeter. Along walkways place tallest furthest away and progressively smaller plants towards the front or edge of the pathway. Once you know the rules, feel free to break them for unusual effects – like an enveloping walkway.
- Mix up the leaf and bloom textures – delicate, lacey, dense, airy, large petaled, succulent and small leafed to name a few.
- Choose plants with fragrance if this is important to you, especially planting them near walkways.
- Choose plants that attract pollinators like birds, bees and wasps; include small water bowls with landing stones in them as drinking fountains or a bird bath with a sun-activated sprinkler so the moving water discourages mosquitos or install a small bubbler fountain to enjoy wildlife visits.
- Plan a garden for all seasons with plants and evergreens that bloom at different times so you can enjoy your garden year-round. Consider planting vegetables, herbs and lettuces in amongst the flowers for a truly rewarding gardening experience.
- Fix any drainage problems as one of the first tasks.
- Test your Soil and amend it appropriately before planting. If moss has been a problem in past or in your lawn that you are planning to remove, consider adding dolomite to the soil in the appropriate amounts. (I even added it to the crushed fine stone pathway in the hope that it would cut down on moss forming. I swore this would be the last year I pulled up moss from all gardens.)
In a hurry for a certain look? Here’s a recipe to rust your steel, stainless steel, Corten steel faster than mother nature:
Ingredients:
- 2 oz vinegar
- 16 oz hydrogen peroxide
- ½ tbsp salt
- Empty bottle sprayer
- Safety glasses
- Plastic gloves
Set steel planter or edging on grass or covered surface outdoors to catch rust-coloured liquid. Combine first 3 ingredients in the spray bottle. Shake. Apply over all of the surfaces that show. Let dry. Repeat until you see the desired effect. It can take 6-10 separate applications to achieve a fully covered rusty effect. The succulent-filled stainless-steel bowl in the photo above took 4 applications, all done in one sunny day.
Photos and text by Susan L. Student MG


